Interactive Visualization Nodes
Connecting to the Visualization Node
To start working with the visualization node, you'll need to establish a connection. This is achieved through a protocol called Secure Shell (SSH). Using the command below, you can log in to the node. Make sure to replace 'user' with your personal username.
$ ssh user@ag-02.sw.ehu.es
Understanding the Node
The compute node 'ag-02' comes with the following specifications:
| Compute Node | Processor | # of Cores | Memory (GB) | GPU | Availability |
|---|---|---|---|---|---|
| ag-02 | Intel Xeon E5-2630 v2 | 12 | 296 | 1x NVIDIA Tesla K40c | Available |
These specs tell you what resources are available on this node.
Available Filesystems
The visualization node provides access to the following filesystems:
| Filesystem | Mount Point |
|---|---|
| Atlas EDR scratch | /scratch-edr |
| Atlas FDR scratch | /scratch-fdr |
| molecules-02 | /molecules |
| skandal-01 | /skandal |
Using X2Go for a Graphical Session
X2Go is a powerful tool that lets you remotely access a full-featured graphical desktop environment on the visualization node. This is particularly useful if you're working with software that requires a graphical user interface (GUI).
Here's a step-by-step guide on how to set up an X2Go session:
-
Install X2Go Client: Before you start, ensure you have the X2Go client installed on your local computer. You can download it from the official X2Go website.
-
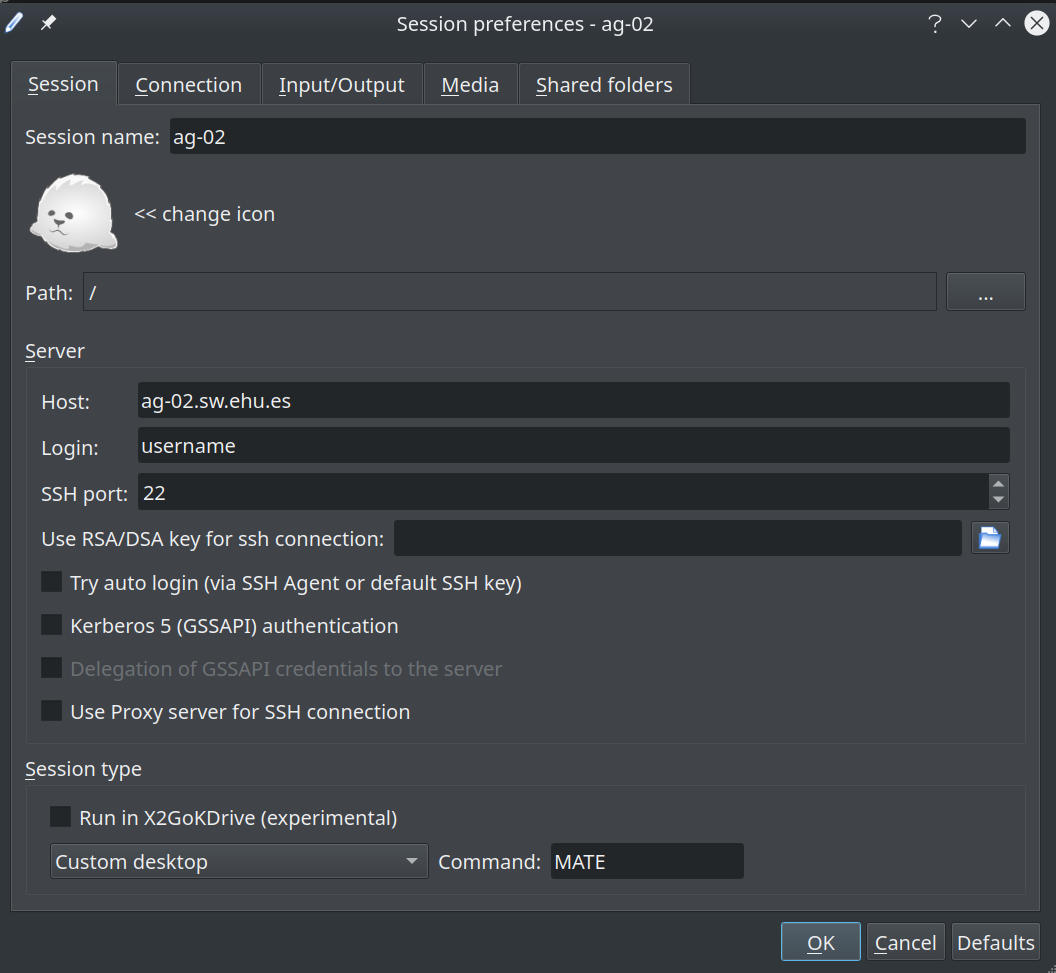
Configure the Session: Open the X2Go client and click on the 'Session' tab at the top. Then click 'New Session'. A new window will open where you can configure your session.
-
In the 'Host' box, type
ag-02.sw.ehu.es. -
In the 'Login' box, enter your username.
-
In the 'Session type' section, select 'MATE' from the dropdown menu.
See the first image below for reference:
-
-
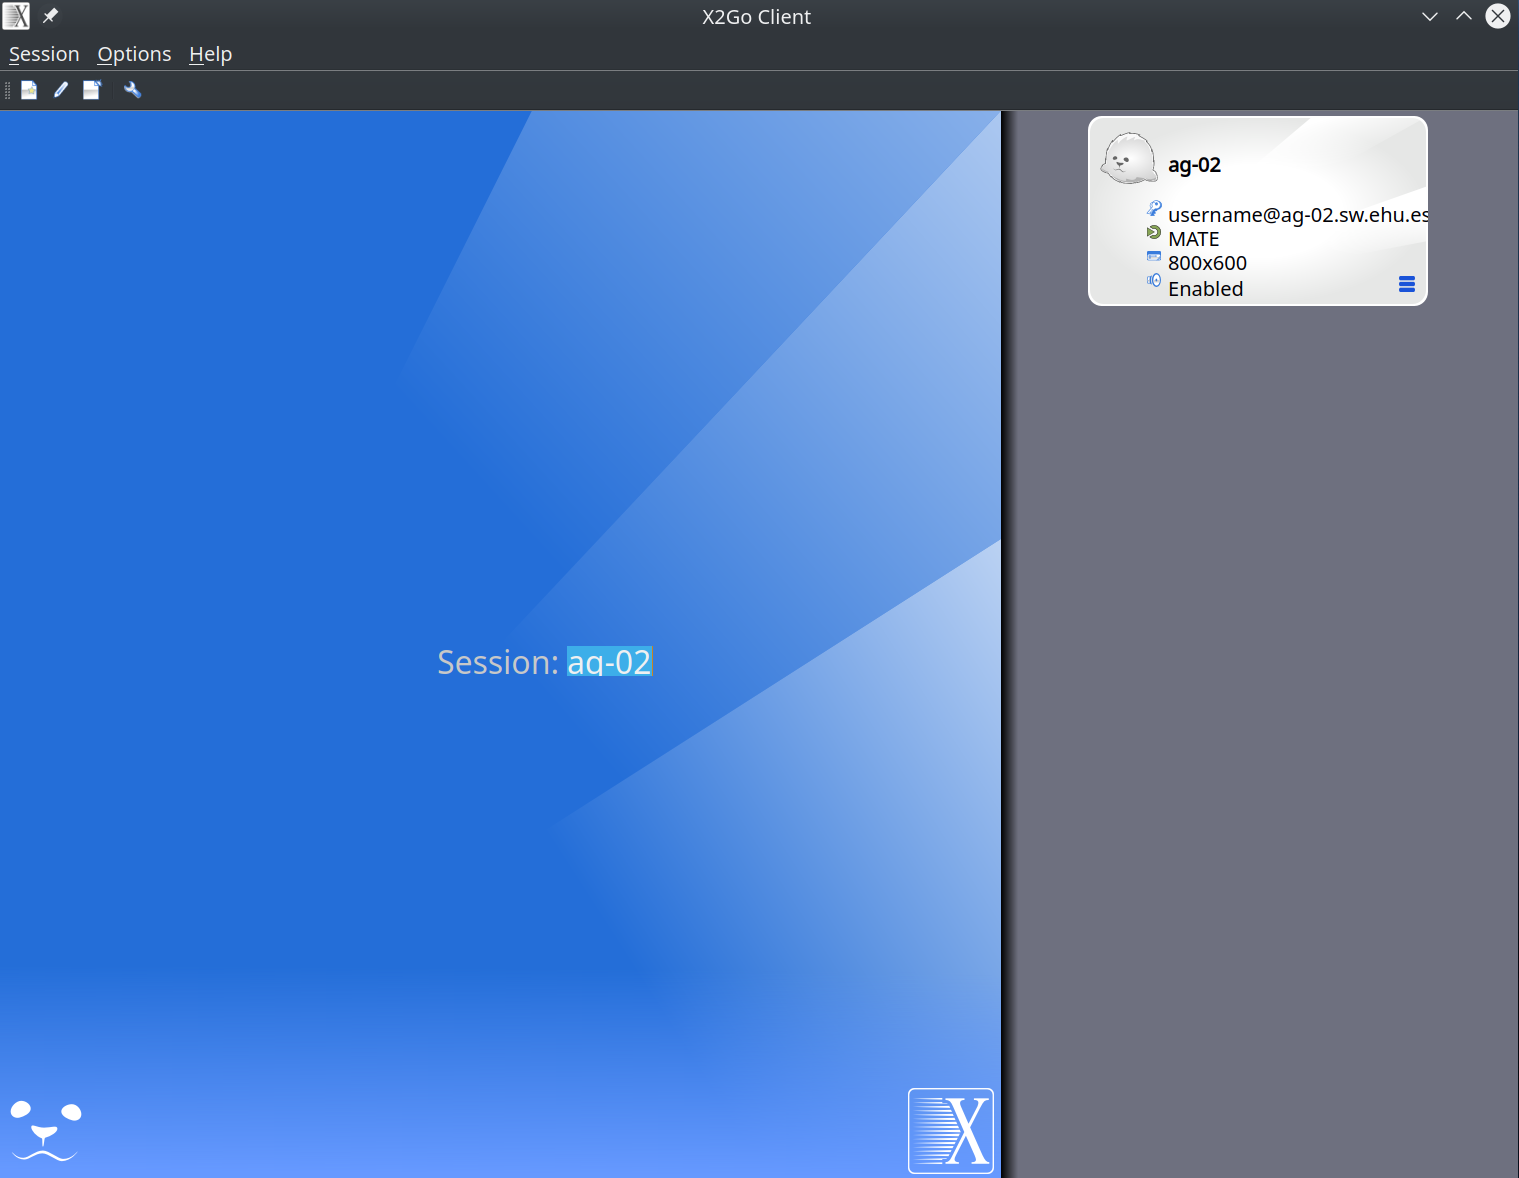
Start the Session: Your new session will now appear in the X2Go client's main window. To start it, just double-click on the session name.
-
Enter your Credentials: A new window will open asking for your password. Enter your password and click 'OK'.
-
Using the Remote Desktop: Once you're logged in, you'll see a remote desktop that looks something like this:
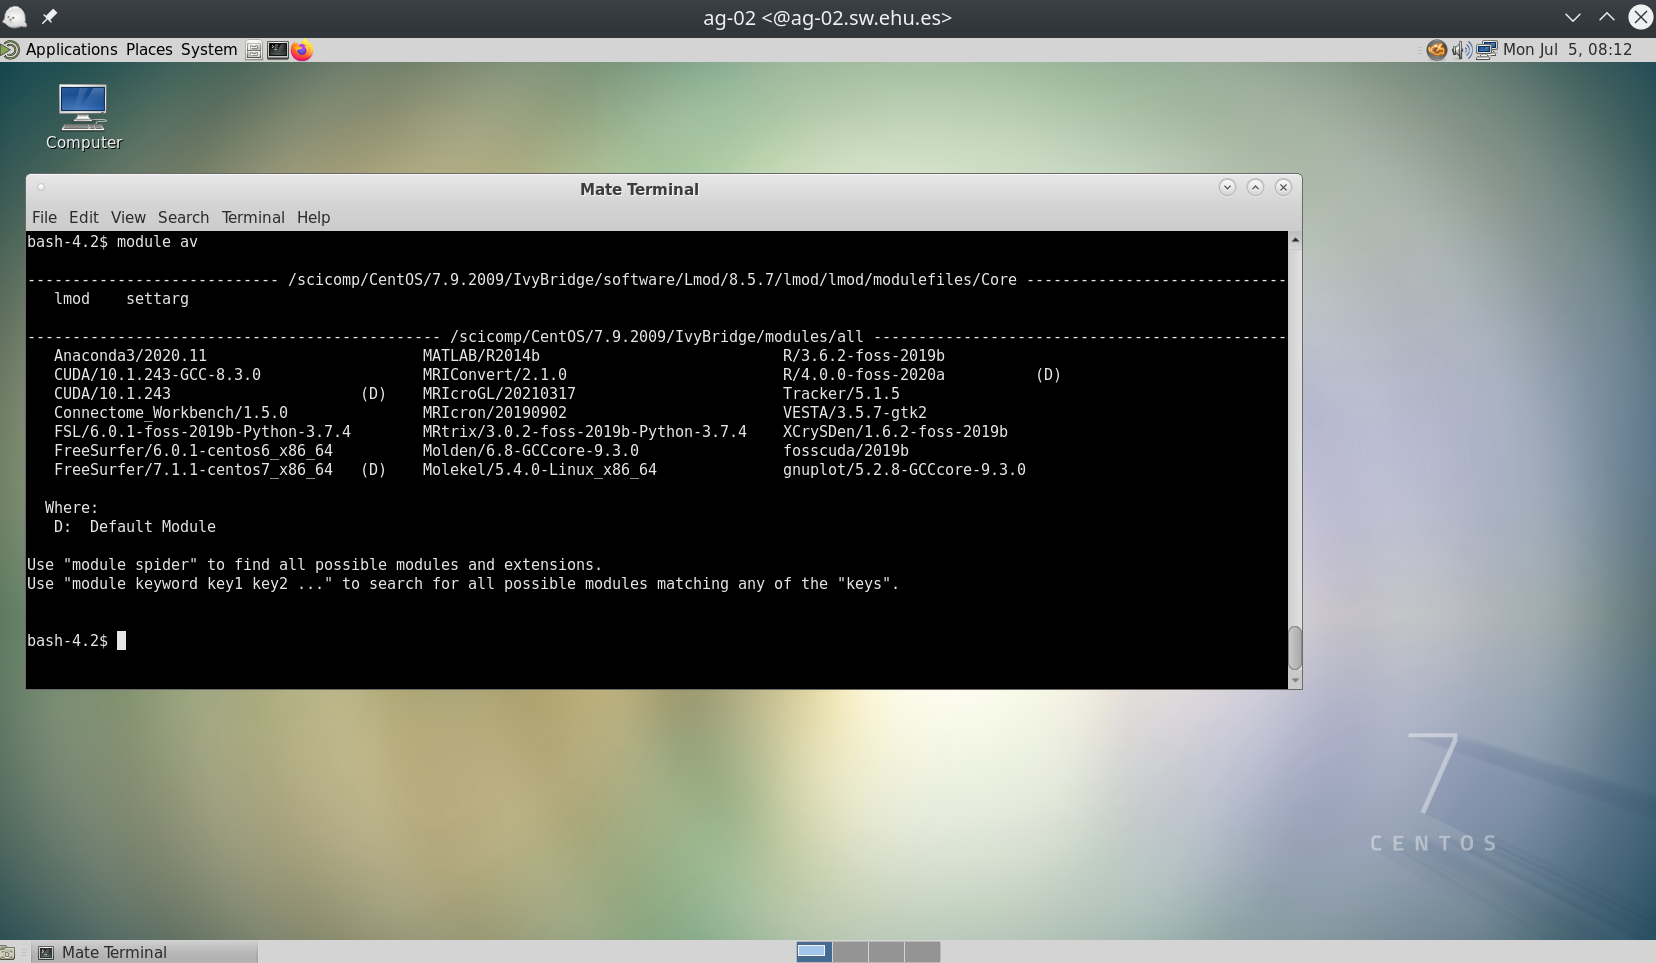
You can interact with this desktop just as you would with a local desktop. When you're done, you can close the session by clicking the 'Logout' button in the desktop's main menu.
Remember, if you need more information on how to install X2Go and set up a connection, our X2Go guide provides a detailed walkthrough.
Of course, let's dive deeper into using VirtualGL for remote graphical sessions.
Setting Up a Remote Session with VirtualGL
VirtualGL is a software package that allows you to run OpenGL and other graphics-heavy applications over a network with minimal loss of performance. It does this by rendering the graphics on the server-side (where the application is running), and then sending just the final frames to your local machine (the client). This approach is especially useful when you're working over slower network connections.
Here's a more detailed guide on how to set up a VirtualGL session:
-
Install VirtualGL: First, you need to install the VirtualGL client on your local machine. This is the software that will receive and display the rendered graphics from the server. You can download it from the official VirtualGL website.
-
Establish a Connection: Once you've installed VirtualGL, you can establish a connection with the visualization node. This is done using the
vglconnectcommand, followed by your username and the address of the node, like so:$ vglconnect -s <username>@ag-02.sw.ehu.esReplace
<username>with your actual username. -
Run Your Application: After establishing a connection, you can start your graphics-heavy application using the
vglruncommand, like so:$ vglrun <application>Replace
<application>with the name of the application you want to run.
Remember, the beauty of VirtualGL is that it allows you to use applications that require a lot of graphical processing power even if your local machine isn't that powerful or if your network connection is a bit slow. It does this by offloading most of the heavy lifting to the server, which is often much more powerful.
Take note that the performance of VirtualGL (and any other remote display software) will always be limited by the speed of your network connection. A faster connection will allow for a smoother and more responsive user experience.
Absolutely, let's expand on the process of setting up a remote session with a VNC server.
Setting Up a Remote Session with a VNC Server
Virtual Network Computing (VNC) is a technology that allows you to remotely control another computer over a network connection. In the context of our visualization nodes, this technology is used to enable you to control the node from your local machine, seeing the node's desktop and interacting with it as if you were physically sitting in front of it.
This can be particularly useful when you need to use software that has a graphical interface, or when you need a persistent session that stays active even when you disconnect.
Here's a more detailed guide on how to set up a VNC session:
-
Start the VNC Server: The first step is to start a VNC server on the visualization node. This is done by logging into the node (using SSH) and issuing the following command:
$ /opt/TurboVNC/bin/vncserver :XIn this command,
Xrepresents the display number. If you don't specify a display number, the system will automatically choose one for you. -
Configure the VNC Server: The first time you run the VNC server, you'll be asked to set a password. This password is used to secure your VNC sessions and ensure that only you can access them.
After setting the password, the server will start and you'll see a message that looks something like this:
$ /opt/TurboVNC/bin/vncserver

You will be required to provide a password to access your sessions.

Password:
Verify:
Would you like to enter a view-only password (y/n)? n

Desktop 'TurboVNC: ag-02.sw.ehu.es:X (<username>)' started on display ag-02.sw.ehu.es:X

Creating default startup script ~/.vnc/xstartup.turbovnc
Starting applications specified in ~/.vnc/xstartup.turbovnc
Log file is ~/.vnc/ag-02.sw.ehu.es:X.log
In this output,
Xrepresents the display number. The display number is a unique identifier for each VNC server instance you launch. For example, ifXis 1, then you've started the first VNC server instance.The display number also directly relates to the port number that the VNC server listens on. By default, VNC servers start at port number 5900 and increment by 1 for each new display. So, a VNC server with display number 1 would listen on port 5901, display number 2 on port 5902, and so on.
This is important when you're connecting to your VNC session from your VNC client, as you'll need to specify the correct port number to establish the connection.
-
Adjust the Display Resolution: You can also specify the resolution of the remote desktop using the
-geometryoption, like so:$ /opt/TurboVNC/bin/vncserver -geometry 1900x1200 :XThis command starts a VNC server with a display resolution of 1900x1200. You can adjust the numbers to match your preferred resolution.
-
Configure the VNC Startup Script: The message
Creating default startup script ~/.vnc/xstartup.turbovncindicates that a startup script has been created for your VNC sessions. This script, located at~/.vnc/xstartup.turbovncin your home directory, is executed whenever you start a new VNC session.The purpose of the startup script is to initialize your graphical desktop environment when the VNC session starts. It controls which desktop environment is launched (in our case, we're using MATE), and can also be customized to automatically start other applications or services each time a VNC session is initiated.
Here's an example of what your
~/.vnc/xstartup.turbovncfile might look like:#!/bin/sh unset SESSION_MANAGER unset DBUS_SESSION_BUS_ADDRESS /usr/bin/mate-session [ -x /etc/vnc/xstartup ] && exec /etc/vnc/xstartup [ -r $HOME/.Xresources ] && xrdb $HOME/.Xresources xsetroot -solid grey vncconfig -iconic & x-terminal-emulator -geometry 80x24+10+10 -ls -title "$VNCDESKTOP Desktop" & x-window-manager &It's important to ensure that this file has the appropriate execution permissions. If you find that your desktop environment does not start correctly when you connect to your VNC session, you may need to check and modify the contents of this file to suit your requirements.
In the script above, we're starting the MATE desktop environment with the command
/usr/bin/mate-session. The remaining lines start some additional services, set up the X resources, and launch a terminal emulator and window manager. -
Connect to the VNC Server: Once the server is up and running, you can connect to it using a VNC client on your local machine. Simply input the address of the server (which looks something like
ag-02.sw.ehu.es:509X), and you should be able to access the remote desktop.Remember, one of the key advantages of VNC is that it allows for persistent sessions. This means that you can start a long-running process in a VNC session, disconnect from the session, and then reconnect later to find the process still running. This can be a game-changer when you're working on computations or tasks that take a significant amount of time to complete.
-
Disconnecting and Reconnecting: To disconnect from your VNC session, you can simply close your VNC client. The session on the server will continue to run. To reconnect, you open your VNC client and connect to the server as you did initially. You will be brought back to the same session, in the state you left it.
-
Shutting Down the VNC Server: If you are finished with your VNC session and do not plan to return to it, it's a good idea to shut down the VNC server. This frees up resources on the server for other users. To do this, use the following command:
$ /opt/TurboVNC/bin/vncserver -kill :XWhere
Xis the display number of the server you wish to shut down.
Recommended VNC Clients for Different Operating Systems
A VNC client allows you to connect to and control a remote computer running a VNC server. The choice of VNC client may depend on your operating system. Here are our recommendations for VNC clients for Linux, macOS, and Windows:
Linux
For Linux users, we recommend the following VNC clients:
-
Remmina: This is a versatile remote desktop client that supports not only VNC, but also protocols like RDP, SSH, and SPICE. It's often the default remote desktop client for many Linux distributions. You can download Remmina from the official Remmina website.
-
TurboVNC: Known for its high-speed operation, TurboVNC is an excellent choice for running 3D and video applications. It provides high-performance over low-bandwidth connections. You can download TurboVNC from the official TurboVNC website.
-
TigerVNC: TigerVNC is a high-performance, platform-neutral implementation of VNC. It offers full client-server compatibility with many other VNC products. You can download TigerVNC from the official TigerVNC website.
macOS
For macOS users, we recommend the following VNC clients:
-
RealVNC Viewer: RealVNC provides a free VNC viewer for commercial and personal use. It offers a seamless and secure remote desktop experience. You can download RealVNC Viewer from the official RealVNC website.
-
Chicken of the VNC: This is a lightweight, open-source VNC client for macOS. It's known for its simple interface and ease of use. You can download Chicken of the VNC from the official Chicken website.
Windows
For Windows users, we recommend the following VNC clients:
-
RealVNC Viewer: RealVNC provides a free VNC viewer for commercial and personal use. It is compatible with most VNC servers and offers a range of features, including chat functionality and file transfer. You can download RealVNC Viewer from the official RealVNC website.
-
TightVNC: This is a free, lightweight VNC client that includes many features of more advanced clients. It's an excellent choice for users who need a simple, effective solution. You can download TightVNC from the official TightVNC website.
Remember to choose the VNC client that best suits your needs and preferences. Each of these recommended clients should provide a reliable connection to your VNC server.
Listing Available Software
To list the software available on the node, use the following command:
$ module av
For additional information about how to use environment modules, refer to our Environment Modules guide.